$ git flow init flags:ERROR short flag required for (showcommands) on this platform flags:ERROR short flag required for (local) on this platform flags:ERROR short flag required for (global) on this platform flags:ERROR short flag required for (system) on this platform flags:ERROR short flag required for (file) on this platform /usr/local/bin/gitflow-common: line 81: [: -eq: unary operator expected /usr/local/bin/gitflow-common: line 81: [: -eq: unary operator expected /usr/local/bin/gitflow-common: line 81: [: -eq: unary operator expected No branches exist yet. Base branches must be created now.
命令行出现了警告,告诉我们还没有基础的分支。这是因为测试是全新的仓库作测试,这个我们姑且先不管它,接着引导会向我们确定需要初始化分支的名字,我们都采用默认即可。 直到询问Version tag prefix时,我们采用v作版本前缀,这其实也是很常见的一种习惯。
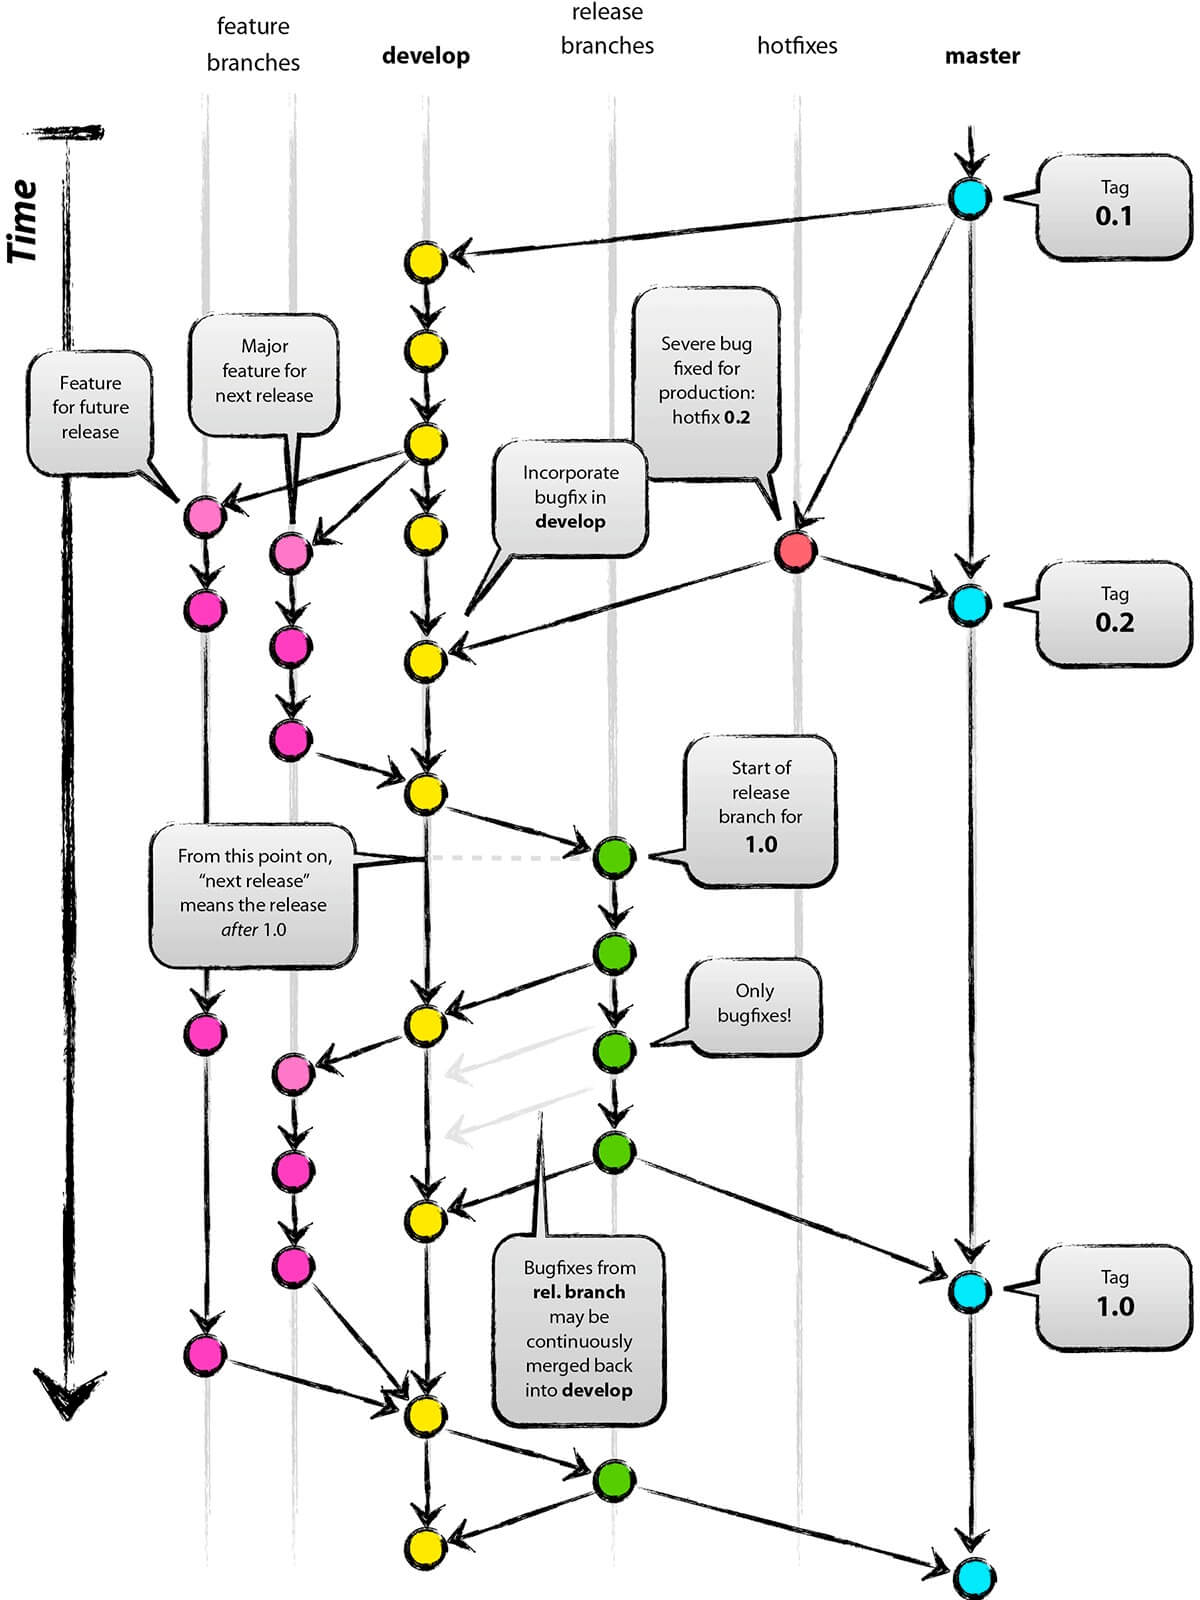
Branch name for production releases: [master] /usr/local/bin/gitflow-common: line 81: [: -eq: unary operator expected
Branch name for"next release" development: [develop] /usr/local/bin/gitflow-common: line 81: [: -eq: unary operator expected /usr/local/bin/gitflow-common: line 81: [: -eq: unary operator expected /usr/local/bin/gitflow-common: line 81: [: -eq: unary operator expected /usr/local/bin/gitflow-common: line 81: [: -eq: unary operator expected /usr/local/bin/gitflow-common: line 81: [: -eq: unary operator expected
How to name your supporting branch prefixes? Feature branches? [feature/] /usr/local/bin/gitflow-common: line 81: [: -eq: unary operator expected Bugfix branches? [bugfix/] /usr/local/bin/gitflow-common: line 81: [: -eq: unary operator expected Release branches? [release/] /usr/local/bin/gitflow-common: line 81: [: -eq: unary operator expected Hotfix branches? [hotfix/] /usr/local/bin/gitflow-common: line 81: [: -eq: unary operator expected Support branches? [support/] /usr/local/bin/gitflow-common: line 81: [: -eq: unary operator expected
Version tag prefix? [] v /usr/local/bin/gitflow-common: line 81: [: -eq: unary operator expected Hooks and filters directory? [/Users/anran/MyProject/git-flow-test/.git/hooks] /usr/local/bin/gitflow-common: line 81: [: -eq: unary operator expected
➜ git-flow-test git:(develop) git push fatal: The current branch develop has no upstream branch. To push the current branch and set the remote as upstream, use
git push --set-upstream origin develop
➜ git-flow-test git:(develop) git push --set-upstream origin develop Counting objects: 5, done. Delta compression using up to 4 threads. Compressing objects: 100% (2/2), done. Writing objects: 100% (5/5), 385 bytes | 385.00 KiB/s, done. Total 5 (delta 0), reused 0 (delta 0) To github.com:anran758/git-flow-test.git * [new branch] develop -> develop Branch 'develop' set up to track remote branch 'develop' from 'origin'. ➜ git-flow-test git:(develop)
➜ git-flow-test git:(develop) git flow -h flags:ERROR short flag required for (showcommands) on this platform usage: git flow <subcommand>
Available subcommands are: init Initialize a new git repo with support for the branching model. feature Manage your feature branches. bugfix Manage your bugfix branches. release Manage your release branches. hotfix Manage your hotfix branches. support Manage your support branches. version Shows version information. config Manage your git-flow configuration. log Show log deviating from base branch.
Try 'git flow <subcommand> help'for details.
因为我们现在是想做一个新功能,feature 就是我们想要的命令。我们进一步查看详情:
1 2 3 4 5 6 7 8 9 10 11 12 13 14 15 16
➜ git-flow-test git:(develop) git flow feature help flags:ERROR short flag required for (showcommands) on this platform usage: git flow feature [list] or: git flow feature start or: git flow feature finish or: git flow feature publish or: git flow feature track or: git flow feature diff or: git flow feature rebase or: git flow feature checkout or: git flow feature pull or: git flow feature delete
Manage your feature branches.
For more specific helptype the command followed by --help
➜ git-flow-test git:(develop) git flow feature start home flags:ERROR short flag required for (showcommands) on this platform /usr/local/bin/gitflow-common: line 81: [: -eq: unary operator expected /usr/local/bin/gitflow-common: line 81: [: -eq: unary operator expected Switched to a new branch 'feature/home'
Summary of actions: - A new branch 'feature/home' was created, based on 'develop' - You are now on branch 'feature/home'
Now, start committing on your feature. When done, use:
随后我创建一个 HTML 文件,并在上面写了少许代码假装(雾)完成了这个新功能的开发。 使用git flow feature finish <name>完成本回合的开发。
1
2
3
4
5
6
7
8
9
10
➜  git-flow-test git:(feature/home) ✗ git flow finish home
Switched to branch 'develop'
Your branch is up to date with 'origin/develop'.
Already up to date.
Deleted branch feature/home (was 61ec91a).

Summary of actions:
- The feature branch 'feature/home' was merged into 'develop'
- Feature branch 'feature/home' has been locally deleted
- You are now on branch 'develop'
# Please enter a commit message to explain why this merge is necessary, # especially if it merges an updated upstream into a topic branch. # # Lines starting with '#' will be ignored, andanempty message aborts # the commit. ~ ~ ~ "~/MyProject/git-flow-test/.git/MERGE_MSG"7L, 256C
➜  git-flow-test git:(hotfix/v1.0.1hotfix) vim index.html
➜  git-flow-test git:(hotfix/v1.0.1hotfix) ✗ vim changelog.md
➜  git-flow-test git:(hotfix/v1.0.1hotfix) ✗ git add .
➜  git-flow-test git:(hotfix/v1.0.1hotfix) ✗ git commit -m "fixed shopping cart bug"
[hotfix/v1.0.1hotfix 1506b7f] fixed shopping cart bug
 2 files changed, 4 insertions(+), 2 deletions(-)
➜  git-flow-test git:(hotfix/v1.0.1hotfix) git flow hotfix finish v1.0.1hotfix
Switched to branch 'master'
Merge made by the 'recursive' strategy.
 changelog.md | 2 ++
 index.html   | 4 ++--
 2 files changed, 4 insertions(+), 2 deletions(-)
Switched to branch 'develop'
Your branch is up to date with 'origin/develop'.
Merge made by the 'recursive' strategy.
 changelog.md | 8 ++++++++
 index.html   | 4 ++--
 2 files changed, 10 insertions(+), 2 deletions(-)
 create mode 100644 changelog.md
Deleted branch hotfix/v1.0.1hotfix (was 1506b7f).

Summary of actions:
- Hotfix branch 'hotfix/v1.0.1hotfix' has been merged into 'master'
- The hotfix was tagged 'vv1.0.1hotfix'
- Hotfix tag 'vv1.0.1hotfix' has been back-merged into 'develop'
- Hotfix branch 'hotfix/v1.0.1hotfix' has been locally deleted
- You are now on branch 'develop'