webpack 是一个现代 JavaScript 应用程序的静态模块打包工具,它对于前端工程师来说可谓是如雷贯耳,基本上现在的大型应用都是通过 webpack 进行构建的。
webpack 具有高度可配置性,它拥有非常丰富的配置。在过去一段时间内曾有人将熟练配置 webpack 的人称呼为 “webapck 工程师”。当然,这称呼只是个玩笑话,但也能从侧面了解到 webpack 配置的灵活与复杂。
为了能够熟练掌握 webpack 的使用,接下来通过几个例子循序渐进的学习如何使用 webpack。
以下 Demo 都可以在 Github 的 webpack-example 中找到对应的示例,欢迎 star~
起步 从 webpack@v4.0.0 开始,就可以不用再引入配置文件来打包项目。若没有提供配置的话,webpack 将按照默认规则进行打包。默认情况下 src/index 是项目的源代码入口,打包后的代码会输出到 dist/main.js 上。
首先来初始化一个项目,项目名为 getting-started :
1
2
3
4
5
6
7
8
# 创建项目文件夹 mkdir getting-started # 进入项目目录 cd getting-started # npm 项目 npm init -y
初始化项目后,项目目录会新增一个 package.json,该文件记录了项目依赖的相关信息。若想要使用 webpack 的话需要安装它的依赖: webpack (本体)和 webpack-cli (可以在命令行操作 webpack 的工具):
1
2
3
4
5
6
# -D 和 --save-dev 选项都可以用于安装开发依赖 # npm i --save-dev webpack webpack-cli npm i -D webpack webpack-cli # 或者使用 yarn 安装开发依赖 yarn add -D webpack webpack-cli
接着创建 webpack 所需的默认入口文件 src/index.js 以及测试模块所用的 src/log.js 文件。此时的项目结构大致如下:
1
2
3
4
5
6
. ├── package.json + ├── src + │ ├── index.js + │ └── log.js └── node_modules
1 2 3 4 5 6 7 export const log = (name ) => console .log(`Hello ${name} !` );import { log } from './log' log('anran758' );
src/log.js 导出了一个工具函数,它负责向控制台发送消息。src/index.js 是默认的入口文件,它引入 log 函数并调用了它。
上面的代码很简单,像这种模块化的代码按照传统 <script src> 引入的话,浏览器是不能正确执行的。可以在根目录上创建一个 index.html 引入 js 脚本来测试一下:
/index.html 1 2 3 4 5 6 7 8 9 10 11 12 13 <!DOCTYPE html > <html lang ="en" > <head > <meta charset ="UTF-8" > <meta name ="viewport" content ="width=device-width, initial-scale=1.0" > <title > Test</title > </head > <body > <script src ="./src/index.js" > </script > </body > </html >
创建文件后,将上例代码复制到 index.html 中。保存并打开该文件,看看浏览器能否正确处理模块逻辑。不出意外的话,文件在浏览器打开后,浏览器开发者工具会抛出错误信息:
1 Uncaught SyntaxError: Cannot use import statement outside a module
言下之意就是说浏览器不能正确的解析 ES module 语句,此时 webpack 就可以派上用场啦~ 在 package.json 中的 scripts 字段中添加如下命令:
/package.json 1 2 3 4 "scripts": { + "build": "webpack" - "test": "echo \"Error: no test specified\" && exit 1" },
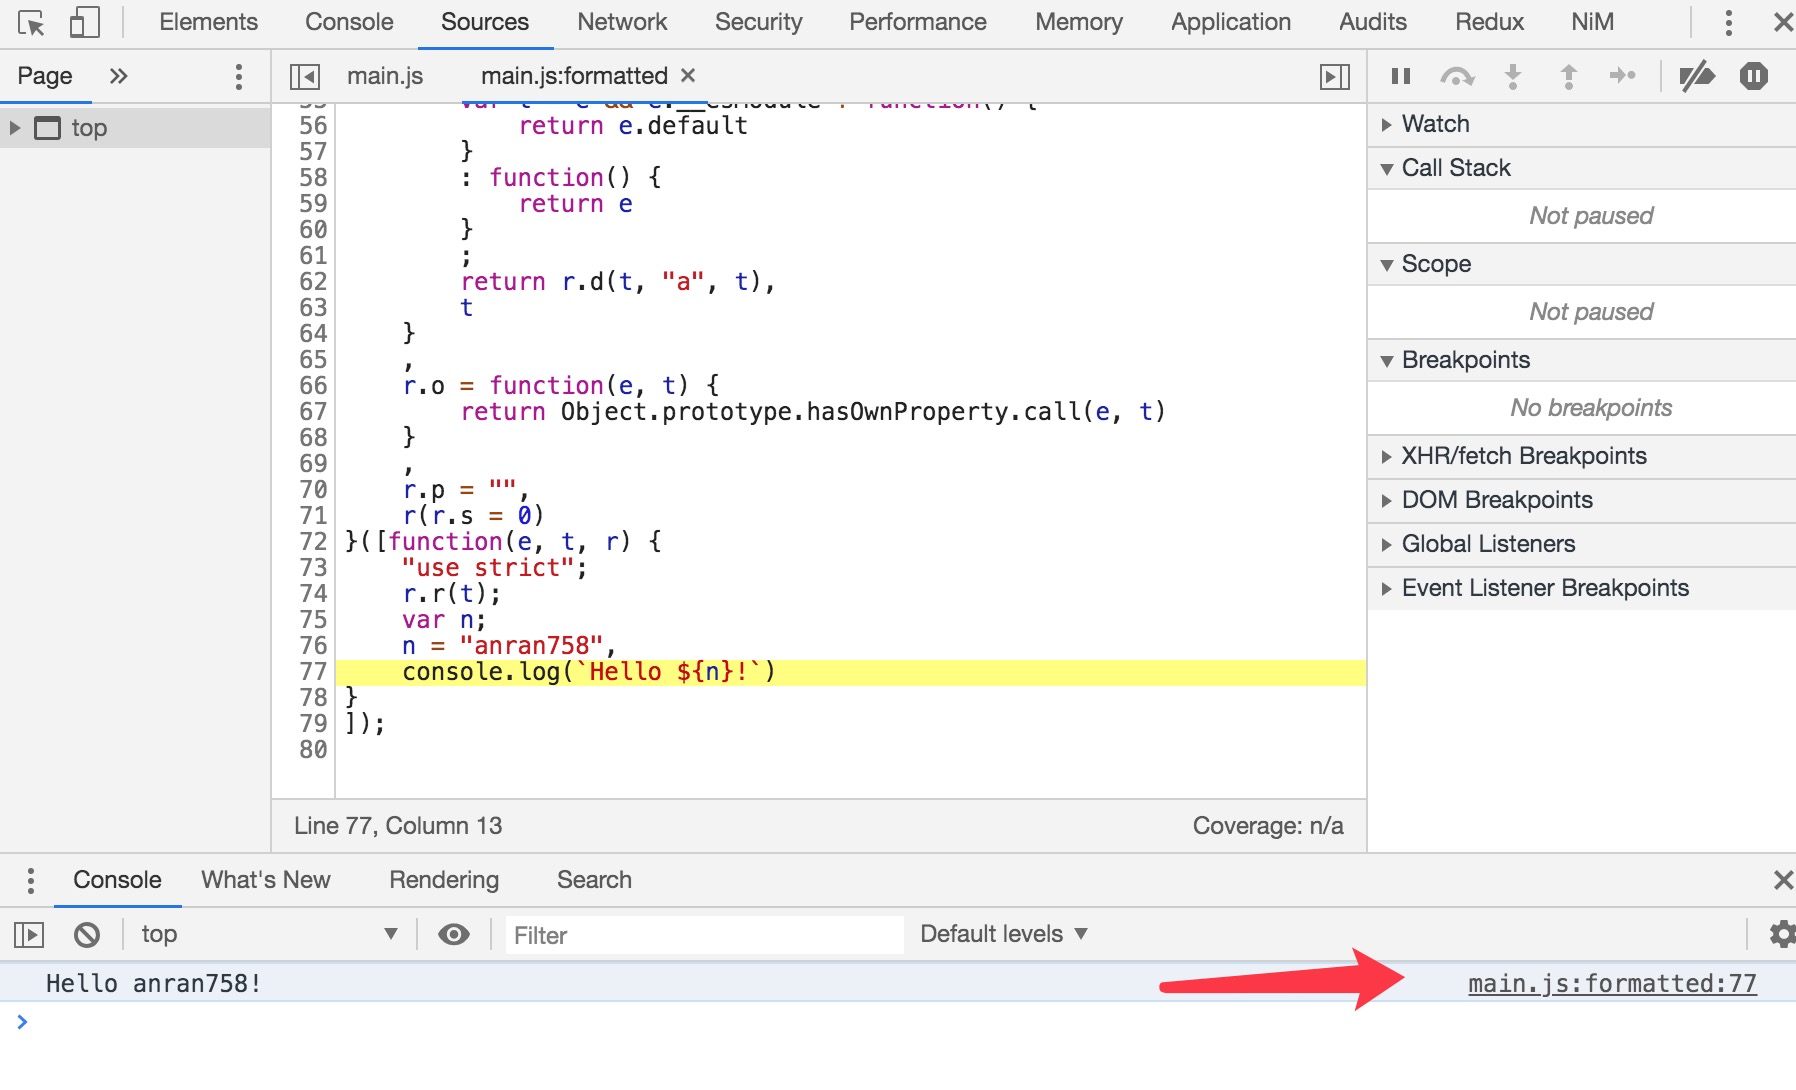
在命令行输入 npm run build 调用 webpack 对当前项目进行编译,编译后的结果会输出到 dist/main.js 文件中(即便本地没有 dist 目录,它都会自动创建该目录)。输出文件后,修改 index.html 对 js 的引用:
/index.html 1 2 3 4 <body> + <script src="./dist/main.js"></script> - <script src="./src/index.js"></script> </body>
重新刷新页面后就能看到 log 正确的输出了 Hello anran758!。点击 log 右侧的链接,可以跳转至 Source 面板,将代码格式化后可以清晰地看到编译后 js 的变化:
使用配置 当然,上例代码只不过是小试牛刀。对于正式的项目会有更复杂的需求,因此需要自定义配置。webpack 主要有两种方式接收配置:
第一种: 通过 Node.js API引入 webpack 包,在调用 webpack 函数时传入配置:
1 2 3 4 5 6 7 8 9 10 11 12 13 const webpack = require ("webpack" );const webpackConfig = { } webpack(webpackConfig, (err, stats ) => { if (err || stats.hasErrors()) { } });
第二种: 通过 webpack-cli 在终端使使用 webpack 时指定配置。
1 webpack [--config webpack.config.js]
两种方法内配置都是相似的,只是调用的形式不同。本篇先使用 webpack-cli 来做示例。
webpack 接受一个特定的配置文件,配置文件要求导出一个对象、函数、Promise 或多个配置对象组成的数组。
现在将上一章的 Demo 复制一份出来,并重命名为 **getting-started-config **,在该目录下新建 webpack.config.js 文件,文件内容如下:
1 2 3 4 5 6 7 8 9 10 11 12 13 14 const path = require ('path' );module .exports = { entry: "./src/index" , output: { path: path.resolve(__dirname, "dist" ), filename: "bundle.js" , } }
上面的配置主要是定义了程序入口、编译后的文件输出目录。然后在 src/index.js 中修改一些内容用来打包后测试文件是否被正确被编译:
src/index.js 1 2 3 4 import { log } from './log' + log('本节在测试配置噢'); - log('anran758');
随后在终端输入 num run build 进行编译,可以看到 dist 目录下多了个 bundle.js。
1 2 3 4 5 6 7 8 9 10 11 12 13 14 15 16 17 $ npm run build > webpack --config ./webpack.config.js Hash: 3cd5f3bbfaf23f01de37 Version: webpack 4.43.0 Time: 117ms Built at: 05/06/2020 1:01:37 PM Asset Size Chunks Chunk Names bundle.js 1010 bytes 0 [emitted] main Entrypoint main = bundle.js [0] ./src/index.js + 1 modules 123 bytes {0} [built] | ./src/index.js 62 bytes [built] | ./src/log.js 61 bytes [built] WARNING in configuration The 'mode' option has not been set, webpack will fallback to 'production' for this value. Set 'mode' option to 'development' or 'production' to enable defaults for each environment. You can also set it to 'none' to disable any default behavior. Learn more: https://webpack.js.org/configuration/mode/
由于我们输出的文件名被修改了,此时还得修改 html 的引入路径。但每改一次输出目录,HTML 中的引入路径也得跟着改,这样替换的话就比较容易出纰漏。那能不能让 webpack 自动帮我们插入资源呢?答案是可以的。
Plugin webpack 提供**插件(plugin)**的功能,它可以用于各种方式自定义 webpack 构建过程。
html-webpack-plugin HTML 文件,并将打包后的 js 代码自动插入到文档中。下面来安装它:
1 npm i --D html-webpack-plugin
安装后在 webpack.config.js 中使用该插件:
1 2 3 4 5 6 7 8 9 10 11 12 13 14 15 16 17 18 19 20 21 22 const path = require('path'); + const HtmlWebpackPlugin = require('html-webpack-plugin'); module.exports = { // 起点或是应用程序的起点入口 entry: "./src/index", // 输出配置 output: { // 编译后的输出路径 // 注意此处必须是绝对路径,不然 webpack 将会抛错(使用 Node.js 的 path 模块) path: path.resolve(__dirname, "dist"), // 输出 bundle 的名称 filename: "bundle.js", }, + plugins: [ + new HtmlWebpackPlugin({ + title: 'Test Configuration' + }) + ], }
重新编译后 HTML 也被输出到 dist 目录下。查看 dist/index.html 的源码可以发现:不仅源码被压缩了,同时 <script> 标签也正确的引入了 bundle.js。
此时目录结构如下:
后续目录展示会将 node_modules、package-lock.json、yarn.lock 这种对项目架构讲解影响不大的目录省略掉..
1 2 3 4 5 6 7 8 9 10 11 . ├── dist │ ├── bundle.js │ ├── index.html │ └── main.js ├── index.html ├── package.json ├── src │ ├── index.js │ └── log.js └── webpack.config.js
处理完资源自动插入的问题后,还有一个问题需要我们处理:虽然 webpack 现在能自动生成 HTML 并插入脚本,但我们还得在 HTML 中写其他代码逻辑呀,总不能去改 /dist/index.html 文件吧?
这个问题也很好解决。html-webpack-plugin 在初始化实例时,传入的配置中可以加上 template 属性来指定模板。配置后直接在指定模板上进行编码就可以解决这个问题了:
1 2 3 4 5 6 7 8 9 10 11 12 13 14 15 16 17 18 19 20 21 22 23 24 25 26 const path = require('path'); const HtmlWebpackPlugin = require('html-webpack-plugin'); module.exports = { // 起点或是应用程序的起点入口 entry: "./src/index", // 输出配置 output: { // 编译后的输出路径 // 注意此处必须是绝对路径,不然 webpack 将会抛错(使用 Node.js 的 path 模块) path: path.resolve(__dirname, "dist"), // 输出 bundle 的名称 filename: "bundle.js", }, plugins: [ // html-webpack-plugin // https://github.com/jantimon/html-webpack-plugin#configuration new HtmlWebpackPlugin({ title: 'Test Configuration', + template: path.resolve(__dirname, "./index.html"), }) ], }
使用模板后 html-webpack-plugin 也会自动将脚本插入到模板中。因此可以将模板中的 <script> 给去掉了。为了测试输出的文件是否使用了模板,在 <body> 内随便插入一句话,重新打包后预览输出的文件是否包含这句话:
/index.html 1 2 3 4 5 6 7 8 9 10 11 12 13 14 <!DOCTYPE html> <html lang="en"> <head> <meta charset="UTF-8"> <meta name="viewport" content="width=device-width, initial-scale=1.0"> + <title>Test Config</title> - <title>Test</title> </head> <body> + <p>Test Config</p> - <script src="./dist/main.js"></script> </body> </html>
修改文件后,重新打包就能看到模板也被压缩输出至 /dist/index.html 了,script 标签也正常的插入了。
清理目录 现在来看编译后的目录,我们发现 dist/mian.js 这文件是使用配置之前编译出来的文件,现在我们的项目已经不再需要它了。这种历史遗留的旧文件就应该在每次编译之前就被扔进垃圾桶,只输出最新的结果。
clean-webpack-plugin rimraf /dist 目录下文件的话,个人是比较倾向使用 rimraf的,因为它更小更灵活。而 clean-webpack-plugin 是针对 webpack 输出做的一系列操作。
在终端安装依赖:
rimraf 的命令行的语法是: rimraf <path> [<path> ...],我们在 package.json 的 scirpts 中修改 build 的命令:
/package.json 1 2 3 4 "scripts": { + "build": "rimraf ./dist && webpack --config ./webpack.config.js" - "build": "webpack --config ./webpack.config.js" }
1 2 3 4 5 6 7 8 9 10 11 12 13 14 15 16 17 18 19 20 21 22 23 $ npm run build > rimraf ./dist && webpack --config ./webpack.config.js Hash: 763fe4b004e1c33c6876 Version: webpack 4.43.0 Time: 342ms Built at: 05/06/2020 2:35:49 PM Asset Size Chunks Chunk Names bundle.js 1010 bytes 0 [emitted] main index.html 209 bytes [emitted] Entrypoint main = bundle.js [0] ./src/index.js + 1 modules 123 bytes {0} [built] | ./src/index.js 62 bytes [built] | ./src/log.js 61 bytes [built] WARNING in configuration The 'mode' option has not been set, webpack will fallback to 'production' for this value. Set 'mode' option to 'development' or 'production' to enable defaults for each environment. You can also set it to 'none' to disable any default behavior. Learn more: https://webpack.js.org/configuration/mode/ Child HtmlWebpackCompiler: 1 asset Entrypoint HtmlWebpackPlugin_0 = __child-HtmlWebpackPlugin_0 1 module
这样 webpack 输出的 /dist 目录始终是最新的东西。
loader 在正常的页面中,引入 css 样式表会让页面变得更美观。引入图片可以让页面内容更丰富。
然而 webpack 本体只能处理原生的 JavaScript 模块,你让它处理 css 或图片资源,它是无法直接处理的。为了处理这种问题,webpack 提供了 loader
loader 一般是单独的包,我们可以在社区找到对应 loader 来处理特定的资源。在使用前通过 npm 安装到项目的开发依赖中即可。loader 可以通过配置 、内联 或 Cli 这三种方式来使用。下文主要以 配置 的方式来使用。
css 往常引入 css 样式表无非就是在 html 中通过 <link> 标签引入。现在想通过 webpack 来管理依赖得需要安装对应的 loader 来处理这些事。
css-loader css 资源。光有让 webpack 识别 css 的能还不够。为了能将 css 资源进行导出,还要安装 mini-css-extract-plugin
现在将上一节的 Demo 复制并重名为 getting-started-loader-css 。进入新的项目目录后安装依赖:
1 npm install -D css-loader mini-css-extract-plugin
在更改配置之前,为了使项目结构更清晰,咱们按照文件类型重新调整源码目录结构 。将 src 下的 js 文件都放进 js 文件夹中。同时创建 /src/css/style.css 样式表。调整后的目录结构如下:
1 2 3 4 5 6 7 8 9 10 . ├── package.json ├── src │ ├── index.html │ ├── css │ │ └── style.css │ └── js │ ├── index.js │ └── log.js └── webpack.config.js
现在将 Flexbox 布局用例 中结尾的 Demo 迁移到项目中,测试一下效果:
HTML 源码 /src/index.html 1 2 3 4 5 6 7 8 9 10 11 12 13 14 15 16 17 18 19 20 21 22 23 24 25 26 27 28 29 30 31 32 33 34 35 36 37 <!DOCTYPE html > <html lang ="en" > <head > <meta charset ="UTF-8" > <meta name ="viewport" content ="width=device-width, initial-scale=1.0" > <title > Test</title > </head > <body > <div class ="panels" > <div class ="panel panel1" > <p class ="item name" > Alice</p > <p class ="item index" > I</p > <p class ="item desc" > Pixiv Content ID: 65843704</p > </div > <div class ="panel panel2" > <p class ="item name" > Birthday</p > <p class ="item index" > II</p > <p class ="item desc" > Pixiv Content ID: 70487844</p > </div > <div class ="panel panel3" > <p class ="item name" > Dream</p > <p class ="item index" > III</p > <p class ="item desc" > Pixiv Content ID: 65040104</p > </div > <div class ="panel panel4" > <p class ="item name" > Daliy</p > <p class ="item index" > IV</p > <p class ="item desc" > Pixiv Content ID: 64702860</p > </div > <div class ="panel panel5" > <p class ="item name" > Schoolyard</p > <p class ="item index" > V</p > <p class ="item desc" > Pixiv Content ID: 67270728</p > </div > </div > </body > </html >
CSS 源码 /src/css/style.css 1 2 3 4 5 6 7 8 9 10 11 12 13 14 15 16 17 18 19 20 21 22 23 24 25 26 27 28 29 30 31 32 33 34 35 36 37 38 39 40 41 42 43 44 45 46 47 48 49 50 51 52 53 54 55 56 57 58 59 60 61 62 63 64 65 66 67 68 69 70 71 72 73 74 75 76 77 78 79 80 81 82 83 84 85 86 87 88 89 90 html { font-family : 'helvetica neue' ; font-size : 20px ; font-weight : 200 ; background : #f7f7f7 ; } body ,p { margin : 0 ; } .panels { display : flex; min-height : 100vh ; overflow : hidden; } .panel { flex : 1 ; display : flex; align-items : center; justify-content : center; flex-direction : column; color : white; background : #ececec ; text-align : center; box-shadow : inset 0 0 0 5px rgba (255 , 255 , 255 , 0.1 ); transition : font-size 0.7s cubic-bezier (0.61 , -0.19 , 0.7 , -0.11 ), flex 0.7s cubic-bezier (0.61 , -0.19 , 0.7 , -0.11 ), background 0.2s ; font-size : 20px ; background-size : cover; background-position : center; cursor : pointer; } .panel1 { background-color : #f4f8ea ; } .panel2 { background-color : #fffcdd ; } .panel3 { background-color : #beddcf ; } .panel4 { background-color : #c3cbd8 ; } .panel5 { background-color : #dfe0e4 ; } .item { flex : 1 0 auto; display : flex; justify-content : center; align-items : center; transition : transform 0.5s ; font-size : 1.6em ; font-family : 'Amatic SC' , cursive; text-shadow : 0 0 4px rgba (0 , 0 , 0 , 0.72 ), 0 0 14px rgba (0 , 0 , 0 , 0.45 ); } .name { transform : translateY (-100% ); } .panel .index { font-size : 4em !important ; width : 100% ; } .desc { transform : translateY (100% ); } .open-active .name ,.open-active .desc { transform : translateY (0 ); width : 100% ; } .panel .open { flex : 3 ; font-size : 40px ; }
JavaScript 源码 /src/js/index.js 1 2 3 4 5 6 7 8 9 10 11 12 13 14 15 16 17 18 19 20 21 22 23 24 25 26 27 28 29 30 import { log } from './log' import '../css/style.css' ;function installEvent ( const panels = document .querySelectorAll('.panel' ) function toggleOpen ( panels.forEach(item => if (item === this ) return ; item.classList.remove('open' ) }); this .classList.toggle('open' ); } function toggleActicon (e ) if (e.propertyName.includes('flex-grow' )) { this .classList.toggle('open-active' ) } } panels.forEach(panel => panel.addEventListener('click' , toggleOpen) panel.addEventListener('transitionend' , toggleActicon) }) } installEvent(); log('本节在测试配置噢' );
修改 webpack 配置,引入 css-loader 和 mini-css-extract-plugin。既然已经对源码目录进行分类了,那顺便也给输出目录的文件也进行分类整理吧:
/webpack.config.js 1 2 3 4 5 6 7 8 9 10 11 12 13 14 15 16 17 18 19 20 21 22 23 24 25 26 27 28 29 30 31 32 33 34 35 36 37 38 39 40 41 42 43 const path = require('path'); + const HtmlWebpackPlugin = require('html-webpack-plugin'); + const MiniCssExtractPlugin = require('mini-css-extract-plugin'); module.exports = { // 起点或是应用程序的起点入口 entry: "./src/js/index", // 输出配置 output: { // 编译后的输出路径 // 注意此处必须是绝对路径,不然 webpack 将会抛错(使用 Node.js 的 path 模块) path: path.resolve(__dirname, "dist"), // 输出 bundle 的名称 - filename: "bundle.js", + filename: "js/bundle.js", + }, + module: { + rules: [ + { + test: /\.css$/i, + use: [MiniCssExtractPlugin.loader, 'css-loader'], + }, + ], + }, plugins: [ // html-webpack-plugin // https://github.com/jantimon/html-webpack-plugin#configuration new HtmlWebpackPlugin({ title: 'Test Configuration', - template: path.resolve(__dirname, "./index.html"), + template: path.resolve(__dirname, "./src/index.html"), + }), + + // 提取 css 到单独的文件 + // https://github.com/webpack-contrib/mini-css-extract-plugin + new MiniCssExtractPlugin({ + // 选项类似于 webpackOptions.output 中的相同选项,该选项是可选的 + filename: 'css/index.css', + }) ], }
现在我们根据上面的配置来解读 loader 的使用:
在上面的配置中,**module ** 规定了如何处理项目中的不同类型的模块。**rules ** 是创建模块时,匹配请求的 rule (规则)数组。rule 是一个对象,其中最常见的属性就是 test 、 use 和 loader 。
rule.test 是匹配条件,通常会给它提供一个正则表达式 或是由正则表达式组成的数组 。如果配置了 test 属性,那这个 rule 将匹配指定条件。比如匹配条件写为 test: /\.css$/i,这意味着给后缀为 .css 的文件使用 loader。
rule.use 顾名思义就是使用,给符合匹配条件的文件使用 loader。它可以接收一个字符串,这个字符串会通过 webpack 的 resolveLoader 选项进行解析。该选项可以不配置,它内置有解析规则。比如下例中默认会从 node_modules 中查找依赖:
rule.use 还可以是应用于模块的 UseEntry 对象。UseEntry 对象内主要有 loader 和 options 两个属性:
1 2 3 4 5 6 7 8 9 use: { loader: 'css-loader' , options: { modules: true } },
如果 UseEntry 对象内只设置 loader 属性,那它与单传的字符串的效果是一样的。而 options 是传递给 loader 的配置项,不同 loader 会提供有不同的 options。值得注意的是,如果 use 是以对象形式传入,**loader 属性是必填的,而 options 是可选的**。
rule.use 还可以是一个函数,函数形参是正在加载的模块对象参数,最终该函数要返回 UseEntry 对象或数组:
1 2 3 4 5 6 7 8 9 10 11 use: (info ) => { console .log(info); return { loader: 'svgo-loader' , options: { plugins: [{ cleanupIDs: { prefix : basename(info.resource) } }] } } }
打印出函数的形参 info 可以看到该对象拥有如下属性:
compiler: 当前的 webpack 编译器(可以未定义)issuer: 导入正在加载的模块的模块的路径realResource: 始终是要加载的模块的路径resource: 要加载的模块的路径,通常等于 realResource。除非在请求字符串中通过 !=! 覆盖资源名。由此可见,使用函数方式可用于按模块更改 loader 选项。
rule.use 最常见的使用形式还是提供一个数组,数组中每项可以是字符串、UseEntry 对象、UseEntry 函数。这也是一个套娃的过程:
1 use: [{ loader : MiniCssExtractPlugin.loader }, 'css-loader' ],
这里需要注意的是,**rule 中使用多个 loader 要注意其顺序。使用数组 loader 将会 从右至左进行应用**。
比如上例中最先通过 css-loader 来处理 .css 文件的引入问题,再通过 MiniCssExtractPlugin.loader (Tips: 该值是 loader 的绝对路径)来提取出文件。如果反过来应用就会出问题了,webpack 都不知道如何引用 css 文件,自然提取不出东西啦。
rule.loader 是 rule.use 的缩写,等价于 rule.use: [{ loader }]。webpack 像这样简写的配置属性还有很多,这样做有利也有弊。对于熟手来说,提供这种简便选项可以减少配置的嵌套关系,但对新手来说,这配置有种错综复杂的感觉。
1 2 3 4 5 6 { test: /\.css$/i , loader: 'css-loader' }
接下来回归正题。重新编译 webpack,编译后的目录结构如下:
1 2 3 4 5 6 7 8 9 10 11 12 13 14 15 16 . ├── dist │ ├── css │ │ └── index.css │ ├── index.html │ └── js │ └── bundle.js ├── package.json ├── src │ ├── css │ │ └── style.css │ ├── index.html │ └── js │ ├── index.js │ └── log.js └── webpack.config.js
image 图片资源也是项目中的常见资源,引入图片资源同样需要安装 loader。处理图片资源的 loader 主要有两种,分别是 url-loader 和 file-loader。
file-loader file-loader import/require() 引入的文件解析为 url,并把文件输出到输出目录中。
复制一份新 Demo 并重命名为 **getting-started-loader-images **。在安装 loader 之前先做一个小优化:
如果我们会频繁修改源码文件,修改完后又要重新编译,这个步骤实际是有点繁琐的。webpack 有个 watch 选项可以监听文件变化,若文件有修改 webpack 将自动编译(若修改的是配置文件的话,还是需要重新运行命令)。
在 package.json 的 script 中给 webpack 添加 -w 选项:
1 2 3 "scripts": { "build:watch": "rimraf ./dist && webpack --config ./webpack.config.js -w" },
接下来就可以安装依赖了:
新建一个 /src/images 文件夹,往里面添加一些图片:
1 2 3 4 5 6 7 8 9 10 11 12 13 14 15 16 17 18 19 . ├── package.json ├── src │ ├── css │ │ └── style.css + │ ├── images + │ │ ├── 01.jpg + │ │ ├── 02.png + │ │ ├── 03.jpg + │ │ ├── 04.png + │ │ ├── 05.png + │ │ ├── 06.jpg + │ │ ├── webpack.jpg + │ │ └── webpack.svg │ ├── index.html │ └── js │ ├── index.js │ └── log.js └── webpack.config.js
在 webpack.config.js 中配置 loader:
1 2 3 4 5 6 7 8 9 10 11 12 13 14 15 16 17 18 19 20 21 rules: [ { test: /\.html$/i, loader: 'html-loader', }, { // 匹配文件规则 test: /\.css$/i, // use 从右至左进行应用 use: [MiniCssExtractPlugin.loader, 'css-loader'], }, + { + test: /\.(png|jpe?g|gif|webp|svg)(\?.*)?$/, + use: { + loader: 'file-loader', + options: { + name: 'img/[name].[hash:8].[ext]' + }, + }, + }, ],
默认情况下图片会被输出到 dist 目录中,文件名也会被更改为一长串的哈希值。为了保持目录整洁,将要被输出的图片资源都归类到 img 目录中。
可以通过设定 name 或 publicPath 来指定目录:
1 2 3 4 5 6 7 8 9 10 11 12 13 14 15 16 use: { loader: 'file-loader' , options: { name: 'img/[name].[hash:8].[ext]' , }, }, use: { loader: 'file-loader' , options: { publicPath: 'img' , name: '[name].[hash:8].[ext]' , }, },
name 属性的值可以用 / 分层。除去最末尾一层的是文件名,前面每层 / 分隔都是嵌套的文件夹。比如值为 static/img/[name].[hash:8].[ext] 最后输出的结果是:根目录创建一个 static 目录,static 内又会创建一个 img 目录,img 内输出被引用的图片资源。
由于匹配的图片资源有很多,咱们不能写死输出的文件名,不然会引发重名问题,操作系统不准这样干。这时 **占位符(placeholder) **就能排上用场了。name 中方括号包裹起来的是占位符,不同占位符会被替换成不同的信息。
比如上例中使用了三个占位符: name 是文件的名称、hash 是指定用于对文件内容进行 hash (哈希)处理的 hash 方法,后面冒号加数值代表截取 hash 的长度为 8、ext 是文件的扩展名。在文件名加入 hash 的用意是针对浏览器缓存而特意加入的。现在可以不用在意这种优化问题,未来会专门另起一篇文章讲优化的问题。
现在修改完 webapck 配置,接着再来完善上一节的 Demo。在 /src/css/styles.css 中使用 backgournd-image 引入图片:
css 引入图片资源 /src/css/style.css 1 2 3 4 5 6 7 8 9 10 11 12 13 14 15 16 17 18 19 20 21 22 23 24 25 .panel1 { background-color : #f4f8ea ; background-image : url ('../images/01.jpg' ); } .panel2 { background-color : #fffcdd ; background-image : url ('../images/02.png' ); } .panel3 { background-color : #beddcf ; background-image : url ('../images/03.jpg' ); } .panel4 { background-color : #c3cbd8 ; background-image : url ('../images/04.png' ); } .panel5 { background-color : #dfe0e4 ; background-image : url ('../images/05.png' ); }
重新编译后的结果如下:
编译结果 1 2 3 4 5 6 7 8 9 10 11 12 13 14 15 16 17 18 19 20 21 22 23 24 25 26 27 28 29 30 31 32 33 34 35 36 37 38 39 40 41 42 43 44 45 46 47 48 49 50 51 52 53 > rimraf ./dist && webpack --config ./webpack.config.js -w webpack is watching the files… Hash: 398663f1f4d417d17c94 Version: webpack 4.43.0 Time: 1086ms Built at: 05/29/2020 2:19:03 PM Asset Size Chunks Chunk Names css/index.css 1.72 KiB 0 [emitted] main img/01.a8e7ddb2.jpg 170 KiB [emitted] img/02.46713ed3.png 744 KiB [emitted] [big] img/03.70b4bb75.jpg 529 KiB [emitted] [big] img/04.b7d3aa38.png 368 KiB [emitted] [big] img/05.875a8bc2.png 499 KiB [emitted] [big] index.html 990 bytes [emitted] js/bundle.js 1.33 KiB 0 [emitted] main Entrypoint main = css/index.css js/bundle.js [0] ./src/css/style.css 39 bytes {0} [built] [1] ./src/js/index.js + 1 modules 938 bytes {0} [built] | ./src/js/index.js 873 bytes [built] | ./src/js/log.js 60 bytes [built] + 1 hidden module WARNING in configuration The 'mode' option has not been set, webpack will fallback to 'production' for this value. Set 'mode' option to 'development' or 'production' to enable defaults for each environment. You can also set it to 'none' to disable any default behavior. Learn more: https://webpack.js.org/configuration/mode/ WARNING in asset size limit: The following asset(s) exceed the recommended size limit (244 KiB). This can impact web performance. Assets: img/04.b7d3aa38.png (368 KiB) img/05.875a8bc2.png (499 KiB) img/02.46713ed3.png (744 KiB) img/03.70b4bb75.jpg (529 KiB) WARNING in webpack performance recommendations: You can limit the size of your bundles by using import() or require.ensure to lazy load some parts of your application. For more info visit https://webpack.js.org/guides/code-splitting/ Child HtmlWebpackCompiler: 1 asset Entrypoint HtmlWebpackPlugin_0 = __child-HtmlWebpackPlugin_0 [0] ./node_modules/html-webpack-plugin/lib/loader.js!./src/index.html 1.01 KiB {0} [built] Child mini-css-extract-plugin node_modules/css-loader/dist/cjs.js!src/css/style.css: Entrypoint mini-css-extract-plugin = * [0] ./node_modules/css-loader/dist/cjs.js!./src/css/style.css 3.09 KiB {0} [built] [3] ./src/images/01.jpg 63 bytes {0} [built] [4] ./src/images/02.png 63 bytes {0} [built] [5] ./src/images/03.jpg 63 bytes {0} [built] [6] ./src/images/04.png 63 bytes {0} [built] [7] ./src/images/05.png 63 bytes {0} [built] + 2 hidden modules
当我们重新打开 /dist/index.html 时会发现图片并没有加载出来?查看 css 源码后发现原来是路径有问题,编译后的路径是 img/01.a8e7ddb2.jpg 这种相对路径。
由于 css 本身有一个文件夹,通过相对路径引入,那就会从 css 目录下进行查找。实际找到的是 dist/css/img/01.a8e7ddb2.jpg 这条路径。
遇到这种情况怎么办呢?我们可以给 MiniCssExtractPlugin.loader 添加 publicPath 选项用以修正路径,重新编译后就可以看到图片正确被加载了:
1 2 3 4 5 6 7 8 9 10 11 12 13 14 { test: /\.css$/i , use: [ { loader: MiniCssExtractPlugin.loader, options: { publicPath: '../' , } }, 'css-loader' ], },
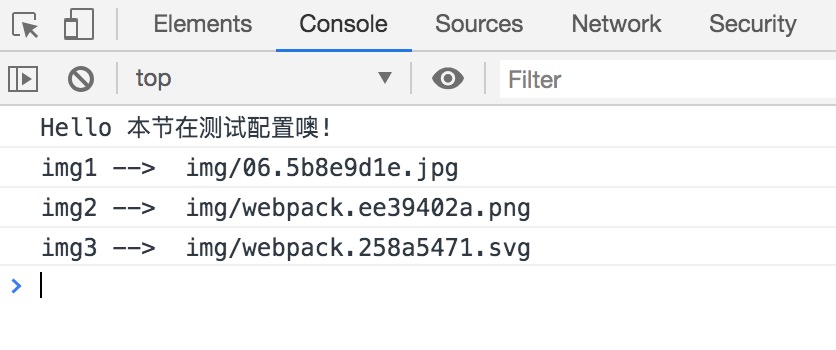
在 js 中也可以引用文件,打开 /src/js/index.js, 在原先的基础上添加如下代码:
1 2 3 4 5 6 7 8 9 10 import img1 from '../images/06.jpg' ;import img2 from '../images/webpack.jpg' ;import img3 from '../images/webpack.svg' ;log('测试图片引入~' ); console .log('img1 --> ' , img1);console .log('img2 --> ' , img2);console .log('img3 --> ' , img3);
重新编译后可以在 Console 面板可以看到 js 输出了文件资源的路径:
url-loader url-loader 功能也类似于 file-loader,不同的是当文件大小(单位 byte)小于 limit 时,可以返回一个 DataURL。
为什么要用 DataURL 呢?我们知道页面上每加载一个图片资源,都会发起一个 HTTP 请求。而建立 HTTP 请求的过程是需要花时间的。因此可以将文件转为 DataURL 嵌入 html/css/js 文件中,这样可以有效减少 HTTP 建立连接时所带来额外的时间开销了。同时 html/css/js 文件也可以被浏览器缓存,DataURL 被引入后也能一同被缓存。
图片转 DataURL 也有缺点,那就是编码后文本储存所占的空间比图片会更大 。这其实就是传输体积与 HTTP 连接数的权衡。所以最佳做法是将小图片转为 DataURL,转换后并不会有过多体积溢出,而大尺寸图片照常引入即可。
安装 url-loader:
1 npm install url-loader -D
修改 webpack.config.js:
1 2 3 4 5 6 7 8 9 10 11 12 13 14 15 16 17 18 19 20 21 22 23 24 25 26 27 28 29 30 31 32 33 rules: [ { test: /\.css$/i , use: [ { loader: MiniCssExtractPlugin.loader, options: { publicPath : '../' } }, 'css-loader' ], }, { test: /\.(png|jpe?g|gif|webp)(\?.*)?$/ , use: { loader: 'url-loader' , options: { limit: 10000 , name: 'img/[name].[hash:8].[ext]' }, }, }, { test: /\.(svg)(\?.*)?$/ , use: { loader: 'file-loader' , options: { name: 'img/[name].[hash:8].[ext]' }, }, }, ],
在上例中将 png、jpg、jpeg、gif、webp 文件交给 url-loader 处理,而 svg 仍由 file-loader 处理。这样做的理由是: DataURL 内联 svg 会破坏 sprite 系统 (将多个 svg 合为一张使用的技术) 中使用的Fragment Identifiers ,因此不将 svg 转为 DataURL。
给 url-loader 设定匹配规则后,配置 name 和 limit 选项。url-loader 的 name 选项与 file-loader 的 name 作用是相同的,就不再累述。
limit 是指定以字节(byte) 为单位的文件最大尺寸。当文件尺寸小于等于 limit 所设的值,那文件将会被转为 DataURL。相反,若文件尺寸大于 limit 时,则使用备用 loader。默认备用 loader 是 file-loader。可以设定 fallback 选项来修改备用 loader。
1 2 3 4 5 6 7 8 { loader: 'url-loader' , options: { limit: 10000 , name: 'img/[name].[hash:8].[ext]' fallback: 'file-loader' } }
limit 的选值不易过大,可以设为 10240 (10KB)或 10000,也可以根据项目实际情况进行调整。
现在来测试 limit 的效果。unix 系统可以在终端使用 ls -l 命令来查看文件信息:
1 2 3 4 5 6 7 8 9 10 11 ➜ getting-started-loader-images git:(master) ✗ cd ./src/images ➜ images git:(master) ✗ ls -l total 6144 -rwxr-xr-x 1 anran staff 173596 May 28 17:41 01.jpg -rwxr-xr-x 1 anran staff 761560 May 28 17:41 02.png -rwxr-xr-x 1 anran staff 542065 May 28 17:41 03.jpg -rwxr-xr-x 1 anran staff 376562 May 28 17:41 04.png -rwxr-xr-x 1 anran staff 510812 May 28 17:41 05.png -rw-r--r-- 1 anran staff 760117 May 28 17:41 06.jpg -rw-r--r--@ 1 anran staff 6943 May 30 13:54 webpack.jpg -rw------- 1 anran staff 647 May 28 21:33 webpack.svg
从输出的信息可以看到 webpack.svg (647B) 和 webpack.jpg (6943B) 的文件尺寸都低于设定的 limit: 10000。由于 svg 文件不通过 url-loader 处理,那按照预想它将会被输出到 /dist/img 中。webpack.jpg 可以被 url-loader,那编译后应该被嵌入到 js 代码中。
重新编译测试一下:
编译结果 1 2 3 4 5 6 7 8 9 10 11 12 13 14 15 16 17 18 19 20 21 22 23 24 25 26 27 28 29 30 31 32 33 34 35 36 37 38 39 40 41 42 43 44 45 46 47 48 49 50 51 52 53 54 55 56 57 58 59 ➜ getting-started-loader-images git:(master) ✗ npm run build > getting-started-loader@1.0.0 build /Users/anran/project_my/webpack-example/getting-started-loader-images > rimraf ./dist && webpack --config ./webpack.config.js Hash: 8d2e8c8220e86d46e388 Version: webpack 4.43.0 Time: 692ms Built at: 05/30/2020 2:08:46 PM Asset Size Chunks Chunk Names css/index.css 1.63 KiB 0 [emitted] main img/01.a8e7ddb2.jpg 170 KiB [emitted] img/02.46713ed3.png 744 KiB [emitted] [big] img/03.70b4bb75.jpg 529 KiB [emitted] [big] img/04.b7d3aa38.png 368 KiB [emitted] [big] img/05.875a8bc2.png 499 KiB [emitted] [big] img/06.5b8e9d1e.jpg 742 KiB [emitted] [big] img/webpack.258a5471.svg 647 bytes [emitted] index.html 990 bytes [emitted] js/bundle.js 10.5 KiB 0 [emitted] main Entrypoint main = css/index.css js/bundle.js [0] ./src/css/style.css 39 bytes {0} [built] [1] ./src/js/index.js + 4 modules 10.1 KiB {0} [built] | ./src/js/index.js 881 bytes [built] | ./src/js/log.js 60 bytes [built] | ./src/images/06.jpg 63 bytes [built] | ./src/images/webpack.jpg 9.08 KiB [built] | ./src/images/webpack.svg 68 bytes [built] + 1 hidden module WARNING in configuration The 'mode' option has not been set, webpack will fallback to 'production' for this value. Set 'mode' option to 'development' or 'production' to enable defaults for each environment. You can also set it to 'none' to disable any default behavior. Learn more: https://webpack.js.org/configuration/mode/ WARNING in asset size limit: The following asset(s) exceed the recommended size limit (244 KiB). This can impact web performance. Assets: img/04.b7d3aa38.png (368 KiB) img/03.70b4bb75.jpg (529 KiB) img/05.875a8bc2.png (499 KiB) img/02.46713ed3.png (744 KiB) img/06.5b8e9d1e.jpg (742 KiB) WARNING in webpack performance recommendations: You can limit the size of your bundles by using import() or require.ensure to lazy load some parts of your application. For more info visit https://webpack.js.org/guides/code-splitting/ Child HtmlWebpackCompiler: 1 asset Entrypoint HtmlWebpackPlugin_0 = __child-HtmlWebpackPlugin_0 [0] ./node_modules/html-webpack-plugin/lib/loader.js!./src/index.html 1.37 KiB {0} [built] Child mini-css-extract-plugin node_modules/css-loader/dist/cjs.js!src/css/style.css: Entrypoint mini-css-extract-plugin = * [0] ./node_modules/css-loader/dist/cjs.js!./src/css/style.css 2.98 KiB {0} [built] [3] ./src/images/01.jpg 63 bytes {0} [built] [4] ./src/images/02.png 63 bytes {0} [built] [5] ./src/images/03.jpg 63 bytes {0} [built] [6] ./src/images/04.png 63 bytes {0} [built] [7] ./src/images/05.png 63 bytes {0} [built] + 2 hidden modules
编译后的目录 1 2 3 4 5 6 7 8 9 10 11 12 13 14 15 16 17 18 19 20 21 22 23 24 25 26 27 28 29 30 31 32 33 34 . ├── dist │ ├── css │ │ └── index.css │ ├── img │ │ ├── 01.a8e7ddb2.jpg │ │ ├── 02.46713ed3.png │ │ ├── 03.70b4bb75.jpg │ │ ├── 04.b7d3aa38.png │ │ ├── 05.875a8bc2.png │ │ ├── 06.5b8e9d1e.jpg │ │ └── webpack.258a5471.svg │ ├── index.html │ └── js │ └── bundle.js ├── package-lock.json ├── package.json ├── src │ ├── css │ │ └── style.css │ ├── images │ │ ├── 01.jpg │ │ ├── 02.png │ │ ├── 03.jpg │ │ ├── 04.png │ │ ├── 05.png │ │ ├── 06.jpg │ │ ├── webpack.jpg │ │ └── webpack.svg │ ├── index.html │ └── js │ ├── index.js │ └── log.js └── webpack.config.js
重新打开 /dist/index.html 后可以在浏览器控制台看到如下输出的信息:
HTML 资源引入 在 HTML 中有一种常见的情况是:在模板中通过相对路径引入图片、脚本等资源时,发现引入的资源都没有被打包进去。
为什么会发生这种情况呢?原来是 webpack 默认不会处理 html 中的资源引入。为了能使 HTML 能通过相对路径引入资源,主要有 3 种解决的方案:
lodash template 现在项目中 /src/index.html 是作为 html-webpack-plugin 的模板,在模板中可以使用 lodash template 语法(以下简称模板语法)来插入内容。语法格式为: <%= value %>
比如在 src/index.html 的模板中插入图片:
/src/index.html 1 2 3 4 5 6 <div class ="panels" > <div class ="panel panel6" > <img class ="img" src ="<%= require('./images/06.jpg').default %>" alt ="" > </div > </div >
/src/css/style.css 1 2 3 4 5 6 7 8 9 10 11 12 13 14 15 16 17 18 19 20 21 22 23 24 25 26 .panel6 { position : relative; overflow : hidden; background-color : #061927 ; } .panel6 .item { position : relative; } .panel6 .img { position : absolute; height : 100% ; transform : scale (1 ); transition : transform 0.4s 0.6s ; } .panel6 .open { flex : 2 ; } .panel6 .open .img { transform : scale (1.2 ); }
上例将通过 require() 函数引入图片。webpack 引入图片时默认是通过 ESModule 来引入的,因此解析的结果大致为 {default: module} 这种形式。因此后面还需要再加一个 default。这样就能正确的引入资源啦。
静态目录 第二种 就是新增一个静态目录 static(或者叫 public)。
HTML 默认不是引用不了源码目录上的资源吗?那我就直接将资源输出到 dist 目录上。模板引用资源时直接引入输出后的文件不就行啦?
copy-webpack-plugin form 处复制文件/文件夹,复制到 to (默认是 webpack 的输出目录)中。现在来安装它:
1 npm i -D copy-webpack-plugin
新增 static 目录,并添加一些测试文件:
1 2 3 4 5 6 7 8 9 10 11 12 13 14 15 16 17 18 19 20 21 22 23 24 . ├── package.json ├── src │ ├── css │ │ └── style.css │ ├── images │ │ ├── 01.jpg │ │ ├── 02.png │ │ ├── 03.jpg │ │ ├── 04.png │ │ ├── 05.png │ │ ├── 06.jpg │ │ ├── webpack.jpg │ │ └── webpack.svg │ ├── index.html │ ├── js │ │ ├── index.js │ │ └── log.js + │ └── static + │ └── images + │ ├── 06.jpg + │ ├── webpack.jpg + │ └── webpack.svg └── webpack.config.js
现在将 src/static/images 的所有文件(不管代码里有没有引入这些文件)都复制到 dist/img 中。
/webpack.config.js 1 2 3 4 5 6 7 8 9 10 11 12 13 { plugins: [ new CopyPlugin({ patterns: [ { from : path.resolve(__dirname, 'src/static/images' ), to: path.resolve(__dirname, 'dist/img' ) }, ], }), ], }
如果你不仅想要复制图片还想要复制其他诸如 css 样式表、js 脚本甚至是 excel 文件到输出目录的话。那可以考虑将 static 目录与 dist 目录进行合并,将 static 和 dist 下的目录名保持一致。
比如将 static 的下 images 文件夹更名为图片输出目录 img,这样打包后会输出到同一个目录中:
/webpack.config.js 1 2 3 4 5 6 7 8 9 10 11 12 13 14 15 16 17 18 19 20 21 22 23 { plugins: [ new CopyPlugin({ patterns: [ { from : path.resolve(__dirname, 'src/static' ), to: path.resolve(__dirname, 'dist' ) }, ], }), ], }
若指定文件/文件夹不想复制到 dist 中,还可以使用 globOptions.ignore 来忽略:
/webpack.config.js 1 2 3 4 5 6 7 8 9 10 11 12 13 14 15 16 { plugins: [ new CopyPlugin({ patterns: [ { from : path.resolve(__dirname, 'src/static' ), to: path.resolve(__dirname, 'dist' ) globOptions: { ignore: ['/**/webpack.jpg' , '/**/img/webpack.svg' ], } }, ], }), ], }
重新修改模板中的图片的引入的路径,使其指向输出目录的 img:
1 2 3 4 <div class ="panel panel6" > <img class ="img" src ="./img/06.jpg" alt ="" > <p class ="item index" > VI</p > </div >
编译后就能看到图片正确被引用了。
html-loader 最后一种 是安装 html-loader,让 webapck 可以处理 html 资源的引入。
1 npm install -D html-loader
1 2 3 4 5 6 7 rules: [ { test: /\.html$/i , loader: 'html-loader' , }, ]
配置 html-loader 后,HTML 访问相对路径的资源就由 html-loader 来进行引入。将模板中的路径改为源码相对路径 :
1 2 3 4 <div class ="panel panel6" > <img class ="img" src ="./images/06.jpg" alt ="" > <p class ="item index" > VI</p > </div >
在实际编译时,<img class="img" src="./images/06.jpg" alt=""> 中 src 的值会被转为 require('./images/06.jpg'),通过 webpack 引入后再将编译后的结果传入图片的 src 属性中。
此时重新编译后就可以正确引入了。但配置 html-loader 的方法会与方法二访问静态目录资源有点冲突 。配置 html-loader 后就不能通过 ./、../ 这种相对路径来访问资输出目录的资源了。
如果我们配置了 html-loader 的同时又还想访问静态资源怎么办呢?这时可以通过根路径 / 逐层来访问,这样 html-loader 就不会处理这种路径:
1 2 3 4 <div class ="panel panel6" > <img class ="img" src ="/img/06.jpg" alt ="" > <p class ="item index" > VI</p > </div >
现在问题又来了,若我们通过根路径来访问资源的话,那就不能单纯地打开文件来在浏览器查看效果了。因为直接打开文件到浏览器上,是通过 file:// 协议打开的。浏览器实际上访问的路径是文件的绝对地址。
比如笔者打开文件后,浏览器地址栏展示的 url 是: file:///Users/anran/project_my/webpack-example/getting-started-static-assets/dist/index.html。现在通过根路径访问资源,需要浏览器补全为完整的 URL,经过浏览器补全后绝对路径是 file:///img/06.jpg。这样路径都是错误的自然就访问不到想要的资源啦。
如果有写过 SPA(单页面应用) 项目的朋友应该很熟悉。将 SPA 项目打包后直接访问 index.html 页面是空白的,这种情况多半就是从根路径引入资源失败而引起的。
这个问题解决的办法也很简单,就是将编译后的项目部署到服务器上,直接通过服务器进行访问,问题就迎刃而解了。为什么这样就可以解决了呢?
比如笔者的网站域名是 anran758.github.io,现在将页面部署到服务器后,直接在浏览器访问 https://anran758.github.io/,实际上访问的是 /dist/index.html 文件。html 通过相对路径访问/img/06.jpg,那补全后图片的路径就是 https://anran758.github.io/img/06.jpg。这样自然就能访问资源啦。
我们不妨通过 Node.js 起一个本地服务器测试一下。在 /dist 同级目录上新建一个 server.js 脚本,添加如下代码:
/server.js 1 2 3 4 5 6 7 8 9 10 11 12 13 14 15 16 17 18 const express = require ('express' );const config = require ('./webpack.config' );const app = express();const PORT = 8001 ;app.use(express.static(config.output.path)); app.listen(PORT, (err ) => { if (err) { console .log(err); return ; } console .log('Listening at http://localhost:' + PORT + '\n' ); })
上例脚本代码是通过 express 快速搭建一个本地服务器,将服务器静态资源入口设为 webpack.config.js 的输出目录(也就是 /dist),随后启动服务器。
express 是基于 Node.js 的 web 框架,要使用它之前需要安装依赖:
package.json 中添加个快捷入口,并在终端运行该脚本:
1 2 3 4 5 6 { "scripts" : { "test:prod" : "node server.js" }, }
1 2 3 4 5 6 ➜ getting-started-static-assets git:(master) ✗ npm run test:prod > getting-started-loader@1.0.0 test :prod /Users/anran/project_my/webpack-example/getting-started-static-assets > node server.js Server is running at http://localhost:8001 . Press Ctrl+C to stop.
打开 http://localhost:8001 后就能看到图片资源正确被引用了。
总结 好啦,现在 webpack 基础篇也到了尾声。我们对上述知识做一个简单的小结:
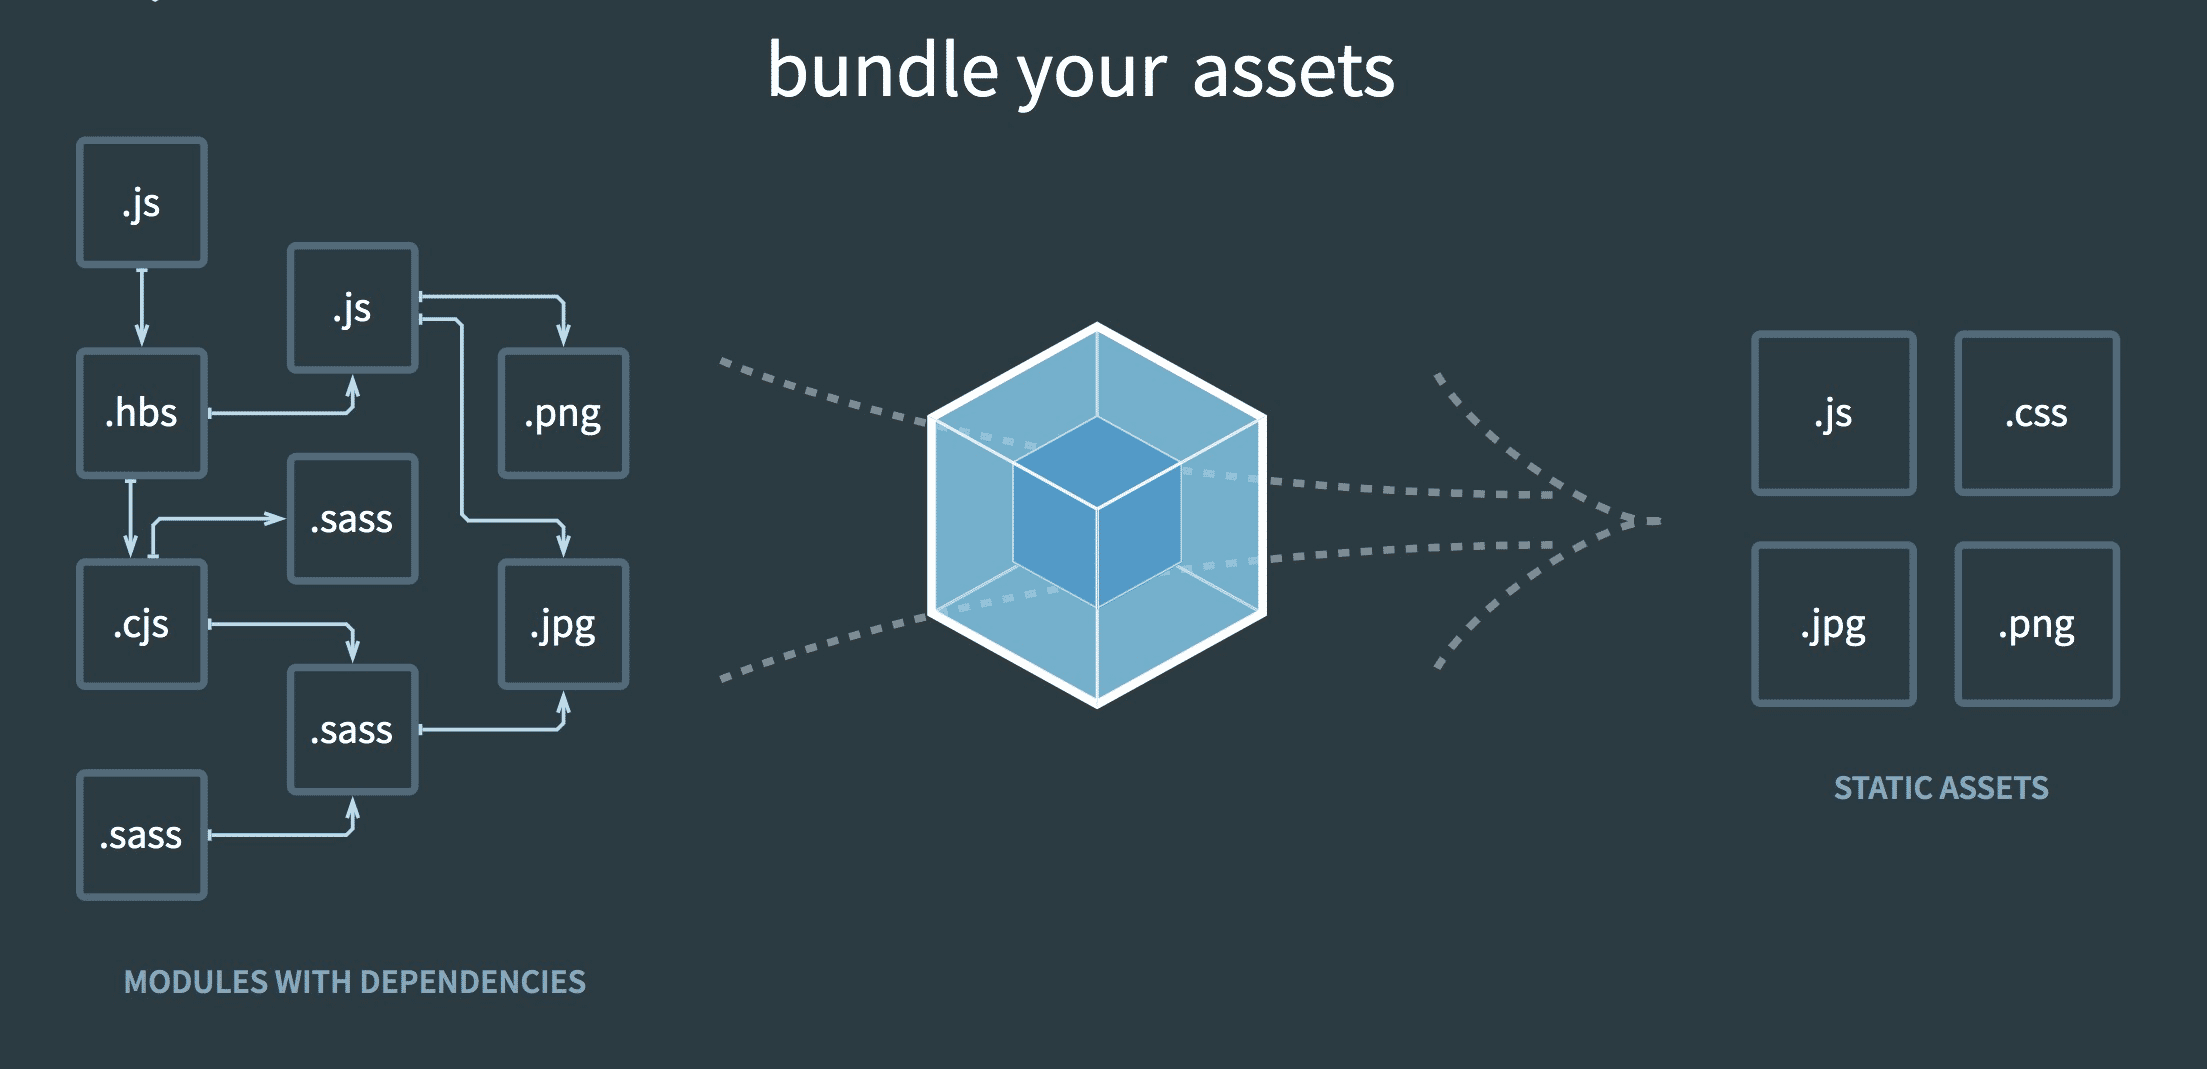
webpack 是一个静态模块打包工具,它本体虽然只支持处理 javascript 的模块,但可以通过 loader 让 webpack 完成原本它不能处理的功能。
webpack 的提供插件的功能,插件可以针对某种需求做特定处理,比如自动给 html 插入资源。
除了静态目录的文件外,我们发现 webpack 输出的文件都是有依赖关系的。为什么会这么说呢?仔细看看 webpack 处理的逻辑就能想清楚了:
webpack 从程序的入口 /src/js/index.js 开始处理,入口文件引入了 style.css,而 style.css 内又引用了图片资源。然后 HTML 再通过 webpack 插件引入模板,再将这些资源插入模板中。这就是文件的依赖关系,这些依赖关系最终会生成一个**依赖图(Dependency Graph)**。
想必看到这里的各位对 webpack 都有了个比较清晰的概念了吧?当然这只是一个开始,后面还有一些高级的概念在本文中由于篇幅的限制无法一并理清。若对笔者 webpack 的笔记感兴趣的话可以继续关注此系列的更新,下一篇将围绕开发环境进行梳理。
参考资料: