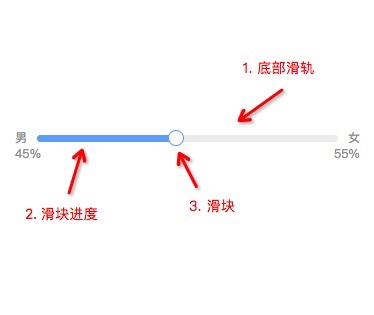
在一些需要用户填写资料的业务场景中,有时会让用户选择某个业务的范围,这时就需要用到滑块进度条。然后你们最爱的产品经理会说,给我整一个颜色可控,滑块按钮可大可小,滑块边框也要可大可小的滑动条来..
emmm,一看这样的设计需求就意味着小程序原生的slider组件就不能用了。因为这玩意在样式上就不能自由的配置,只好来手动实现一个。
结构设计
![slider-bar]()
行吧,那说干就干。首先滑动条可以从俯视图角度来看,分为三层。分别是底部滑轨区域,进度条区域以及供用户操作的滑块本身。
在结构设计中,可以将底部滑轨区域,进度条区域分为一块,这样进度条区域可以根据随着滑动条的高度变化而变化, 宽度则由js控制。除此之外还需要暴露一些参数给外部,让它自己定义长粗宽。
1
2
3
4
5
6
7
8
9
10
11
12
13
14
15
16
17
18
19
20
21
22
23
24
25
26
27
28
29
30
31
32
33
34
35
36
| Component({
properties: {
blockSize: {
type: Number,
value: 32,
},
blockBorderWidth: {
type: Number,
value: 3
},
height: {
type: Number,
value: 2
},
step: {
type: Number,
value: 0,
},
digits: {
type: Number,
value: 0,
},
},
});
|
1
2
3
4
5
6
7
8
9
| <view id="slider-wrap" class="slider-wrap">
<view class="silder-bg" style="height: {{height}}rpx;">
<view class="silder-bg-inner"></view>
</view>
<view
class="silder-block"
style="height: {{blockSize}}rpx; border-width: {{blockBorderWidth}}rpx;"
></view>
</view>
|
1
2
3
4
5
6
7
8
9
10
11
12
13
14
15
16
17
18
19
20
21
22
23
24
25
26
27
28
29
30
31
32
33
34
35
36
37
38
39
40
41
42
43
44
45
46
47
| .slider-wrap {
position: relative;
display: flex;
align-items: center;
width: 100%;
}
.silder-bg,
.silder-bg-inner,
.silder-block {
position: absolute;
left: 0;
}
.silder-bg,
.silder-bg-inner {
width: 100%;
height: 2rpx;
flex: 1;
}
.silder-bg {
overflow: hidden;
background-color: #eeeeee;
border-radius: 8rpx;
z-index: 0;
}
.silder-bg-inner {
height: 100%;
background-color: #66a6ff;
z-index: 1;
border-bottom-left-radius: 8rpx;
border-top-left-radius: 8rpx;
}
.silder-block {
width: 32rpx;
height: 32rpx;
background-color: #ffffff;
border: solid 3rpx #66a6ff;
z-index: 2;
border-radius: 50%;
box-sizing: border-box;
}
|
点击行为事件
滑块进度条的滑块是一个听话的小朋友,就是说我们叫它去哪它就听话的过去。所以就不要抓它去煲汤了~
在组件外部容器中绑定一个点击事件,我们必须得要知道用户点击位置,在bind:tap事件中取到clientX属性。除此之外还需要取到进度条的位置信息。
得到两个关键数据后,将用户点击的位置ClintX与进度条组件的偏移量offset相减,得出相对于组件内的进度progress.
再用组件的宽度width减去progress乘于100得到目前进度的百分比percentage。
同时为了防止进度条超出进度条
如下图所示:((191 - 36) / 301) * 100 ≈ 52
![关系示意图]()
1
2
3
| <view class="slider-wrap" bindtap="tappingSlider">
</view>
|
1
2
3
4
5
6
7
8
9
10
11
12
13
14
15
16
17
18
19
20
21
22
23
24
25
26
27
28
29
30
31
32
33
34
35
36
37
38
39
40
41
42
43
44
45
46
47
48
49
50
51
52
53
54
55
56
57
58
59
60
61
62
63
64
65
| Component({
data: {
containerInfo: null,
percentage: 0,
},
ready() {
wx.createSelectorQuery().in(this)
.select('.slider-wrap')
.boundingClientRect((rect) => {
if (!rect) return;
this.data.container = rect;
this._initBloackPos();
}).exec()
},
tappingSlider(evt) {
const { containerInfo } = this.data;
if (!containerInfo) return;
const { clientX } = evt.changedTouches[0];
const { digits, _maxDistance } = this.data;
const perc = this._computeOffset(clientX, containerInfo.left, 100);
const percentage = this._boundaryHandler(perc);
this.setData({ percentage });
this.triggerEvent('change', {
value: percentage.toFixed(digits) * 1
});
},
_computeOffset(x, offset, maxVal) {
const { width } = this.data.containerInfo;
return (((x - offset) / width) * maxVal).toFixed(4) * 1;
},
_boundaryHandler(num, maxNum = 100, minNum = 0) {
return num > maxNum ? maxNum : (num < minNum ? minNum : num);
},
});
|
1
2
3
4
5
6
7
8
9
10
11
12
| <view class="slider-wrap" bindtap="tappingSlider" bindtouchmove="onTouchMove">
<view class="silder-bg" style="height: {{height}}rpx;">
<view
class="silder-bg-inner"
style="width: {{percentage}}%; height: {{height}}rpx;"
></view>
</view>
<view
class="silder-block"
style="left: {{percentage}}%;width: {{blockSize}}rpx;height: {{blockSize}}rpx; border-width: {{blockBorderWidth}}rpx;"
></view>
</view>
|
虽然实现了点击滑动到指定位置的功能,但仔细一看还是有一些瑕疵的~ 当我们点击到百分百时,滑块超出原先设定的容器宽度。
超出的原因是因为在布局上,我们使用绝对定位absolute,通过设置滑块left属性来控制滑块位置的。
偏移量中还包含了滑块自身的宽度,因此还需要对滑块的偏移量做一定的处理,去掉自身宽度再获取百分比。
在文章开头我们已经暴露了一个blockSize的属性,利用该属性可以计算滑块的最大偏移量:
1
2
3
4
5
6
7
8
9
10
11
12
13
14
15
16
17
18
19
20
21
22
23
24
25
26
27
28
29
30
31
32
33
34
35
| Component({
data: {
_blockOffset: 0,
_maxDistance: 100,
},
methods: {
tappingSlider(evt) {
const { containerInfo } = this.data;
if (!containerInfo) return;
const { clientX } = evt.changedTouches[0];
const { digits, _maxDistance } = this.data;
const computeOffset = (maxVal) => {
return this._computeOffset(clientX, containerInfo.left, maxVal);
}
const _blockOffset = this._boundaryHandler(
computeOffset(_maxDistance), _maxDistance
);
const percentage = this._boundaryHandler(computeOffset(100));
this.setData({ _blockOffset, percentage });
this.triggerEvent('change', { value: percentage.toFixed(digits) * 1 });
},
}
})
|
1
2
3
4
5
|
<view
class="silder-block"
style="left: {{_blockOffset}}%;width: {{blockSize}}rpx;height: {{blockSize}}rpx; border-width: {{blockBorderWidth}}rpx;"
></view>
|
如此,该事件就完成啦~
滑动事件
完成点击事件后,我们还得让它能进行自由的滑动。进度条组件的拖动的流程大致是:点击滑块 -> 拖动滑块 -> 释放滑块这三个步骤。
因此跟H5的思路一样,我们只需监听touchmove、touchstatr、touchend三个事件。
首先先监听touchmove,用户点击滑块后,记录当前的clientX属性, 随后还需要记录当前进度和滑块的偏移量;
touchmove事件则由外层容器相关联,并更新滑动的距离。由于touchmove里针对拖动事件逻辑不能被随便触发,因此需要加一个标识的锁;
在touchend事件触发后释放锁即可:
1
2
3
4
5
6
7
8
9
10
11
12
13
14
15
16
17
18
19
20
21
22
23
24
25
26
27
28
29
30
31
32
33
34
35
36
37
38
39
40
41
42
43
44
45
46
47
48
49
50
| Component({
methods: {
onTouchStart(evt) {
this.data.moving = true;
this.data.originPos = this.data._blockOffset;
this.data.originPercentage = this.data.percentage;
this.data._startTouchX = evt.changedTouches[0].clientX;
},
onTouchMove(evt) {
const { moving, containerInfo } = this.data;
if (!moving || !containerInfo) return;
const { clientX } = evt.changedTouches[0];
const {
digits,
originPos,
originPercentage,
_startTouchX,
_maxDistance
} = this.data;
const computeOffset = (maxVal) => {
return this._computeOffset(clientX, _startTouchX, maxVal);
}
const perc = originPercentage + computeOffset(100);
const percentage = this._boundaryHandler(perc);
const offset = originPos + computeOffset(_maxDistance);
const _blockOffset = this._boundaryHandler(offset, _maxDistance);
this.setData({ percentage, _blockOffset });
this.triggerEvent('change', {
value: percentage.toFixed(digits) * 1
});
},
onTouchEnd(evt) {
this.data.moving = false;
},
}
})
|
1
2
3
4
5
6
7
8
9
10
11
12
13
14
| <view class="slider-wrap" bindtap="tappingSlider" bindtouchmove="onTouchMove">
<view class="silder-bg" style="height: {{height}}rpx;">
<view
class="silder-bg-inner"
style="width: {{percentage}}%; height: {{height}}rpx;"
></view>
</view>
<view
class="silder-block"
style="left: {{_blockOffset}}%;width: {{blockSize}}rpx;height: {{blockSize}}rpx; border-width: {{blockBorderWidth}}rpx;"
bindtouchstart="onTouchStart"
bindtouchend="onTouchEnd"
></view>
</view>
|
总结
以上就是滑块进度条组件的实现~ 实际上该组件还有更多可供配置的地方,如颜色值,背景控制等这些比较基础的东西就不继续展开讲啦~
本文是以小程序进行示例。但思路是共通的,也可以使用同样思路在H5实现,只不过是 API 的差异罢了~
微信代码片段, 可以直接拿来就用。
2019/05/04 更新:
后面又重新看了一遍,发现该组件还是有可优化的空间:
操作不必局限于滑块上,可以将bindtap事件废弃,其余的所有事件都代理到最外部的节点中。touchstar的同时就渲染位置信息,还允许它自由的滑动:
1
2
3
4
5
6
7
8
9
10
11
12
13
14
15
16
| <view class="slider-wrap"
bindtouchstart="onTouchStart"
bindtouchmove="onTouchMove"
bindtouchend="onTouchEnd"
>
<view class="silder-bg" style="height: {{height}}rpx;">
<view
class="silder-bg-inner"
style="width: {{percentage}}%; height: {{height}}rpx;"
></view>
</view>
<view
class="silder-block"
style="left: {{_blockOffset}}%;width: {{blockSize}}rpx;height: {{blockSize}}rpx; border-width: {{blockBorderWidth}}rpx;"
></view>
</view>
|
1
2
3
4
5
6
7
8
9
10
11
12
13
14
15
16
17
18
19
20
21
22
23
24
25
26
27
28
29
30
31
32
33
34
35
36
| Component({
methods: {
onTouchStart(evt) {
this.data.moving = true;
const { containerInfo } = this.data;
if (!containerInfo) return;
const { clientX } = evt.changedTouches[0];
const { digits, _maxDistance } = this.data;
const computeOffset = (maxVal) => {
return this._computeOffset(clientX, containerInfo.left, maxVal);
}
const _blockOffset = this._boundaryHandler(
computeOffset(_maxDistance), _maxDistance
);
const percentage = this._boundaryHandler(computeOffset(100));
this.data.originPos = _blockOffset;
this.data.originPercentage = percentage;
this.data._startTouchX = clientX;
this.setData({ _blockOffset, percentage });
this.triggerEvent('change', { value: percentage.toFixed(digits) * 1 });
},
}
});
|
微信代码片段 v0.0.2


